はじめに
C#のO/Rマッパーを使ってみようと思い調べたところ下記のフレームワークが候補にあがりました。
まずは、Microsoft社製である「Entity Framework」を使ってみることにしました。
- Entity Framework
- Dapper
「Entity Framework」は2つの系統がありMicrosoftの比較サイトを参考に、よりモダンな「EF Core」を選択することにしました。
- Entity Framework(EF)
- Entity Framework Core(EF Core)
EF Coreとは、Microsoftのサイトより引用
Entity Framework Core は、.NET 用の最新のオブジェクト データベース マッパーです。 LINQ クエリ、変更の追跡、更新、スキーマの移行がサポートされています。 EF Core は、SQL Database (オンプレミスと Azure)、SQLite、MySQL、PostgreSQL、Azure Cosmos DB などの多くのデータベースに対応しています。
ツール
EF Coreには便利なコマンドツールが用意されており主にスキャフォールディングで使用されます。両方のツールで同じ機能が提供されてます。
- EF Core パッケージ マネージャー コンソール ツール
EF Core パッケージ マネージャー コンソール ツールは、Visual Studio のパッケージ マネージャー コンソールで実行されます。 Visual Studio で開発している場合、統合性に優れたこれらのツールの使用をお勧めします。
インストール手順
Visual Studioの「ツール」>「NuGet パッケージ マネージャー」>「パッケージ マネージャー コンソール」で、下記を実行する。Install-Package Microsoft.EntityFrameworkCore.Tools Update-Package Microsoft.EntityFrameworkCore.Tools - EF Core .NET CLI ツール
EF Core .NET コマンド ライン インターフェイス (CLI) ツールは、クロス プラットフォームの .NET Core CLI ツールの拡張機能です。 これらのツールには、.NET Core SDK プロジェクトが必要です (プロジェクト ファイルに Sdk=”Microsoft.NET.Sdk” か同様のものが含まれる)。
インストール手順
コマンドプロンプトで、下記を実行する。dotnet tool install --global dotnet-ef cd プロジェクトフォルダ(*.csprojがある場所) dotnet add package Microsoft.EntityFrameworkCore.Design
開発手法
EF Coreは下記の開発手法をサポートしてます。
- Code-First
モデルクラスを作成し、それを基にデータベースのテーブルを作成する。

手順
コマンドプロンプトで、下記の.NET CLIを実行するdotnet ef migrations add InitialCreate dotnet ef database update - Database-First
データベースにすでにテーブルがあり、それをリバースエンジニアリングしてモデルクラスを作成する。

手順
コマンドプロンプトで、下記の.NET CLIを実行するdotnet ef dbcontext scaffold <接続文字列> <プロバイダ(e.g. Microsoft.EntityFrameworkCore.SqlServer)> -o <生成したクラスファイルの出力先> - スキャフォールディング
ASP.NET CoreのスキャフォールディングにEF Coreを組み合わせることもできます。
手順
Visual StudioのソリューションエクスプローラーでASP.NET Coreのプロジェクトを右クリックして「追加」>「新規スキャフォールディングアイテム」で、追加するアイテムを選択する。
EF Coreを使う
Microsoftのチュートリアルを基に、ASP.NET CoreでEF Coreを使ってみました。
ソースコードはGitHubリポジトリにあります。
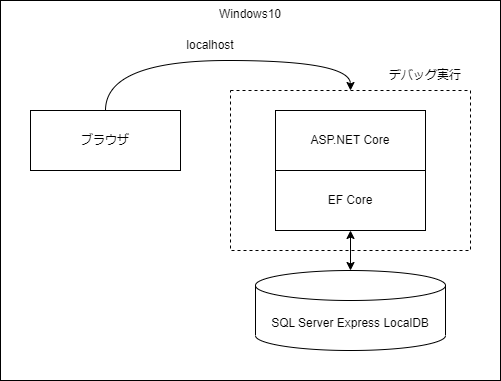
環境
- Windows 10 64bit
- Visual Studio Community 2022
- C#
- .NET 7.0
- ASP.NET Core Webアプリ(Model-View-Controller)
- SQL Server Express LocalDB
構成
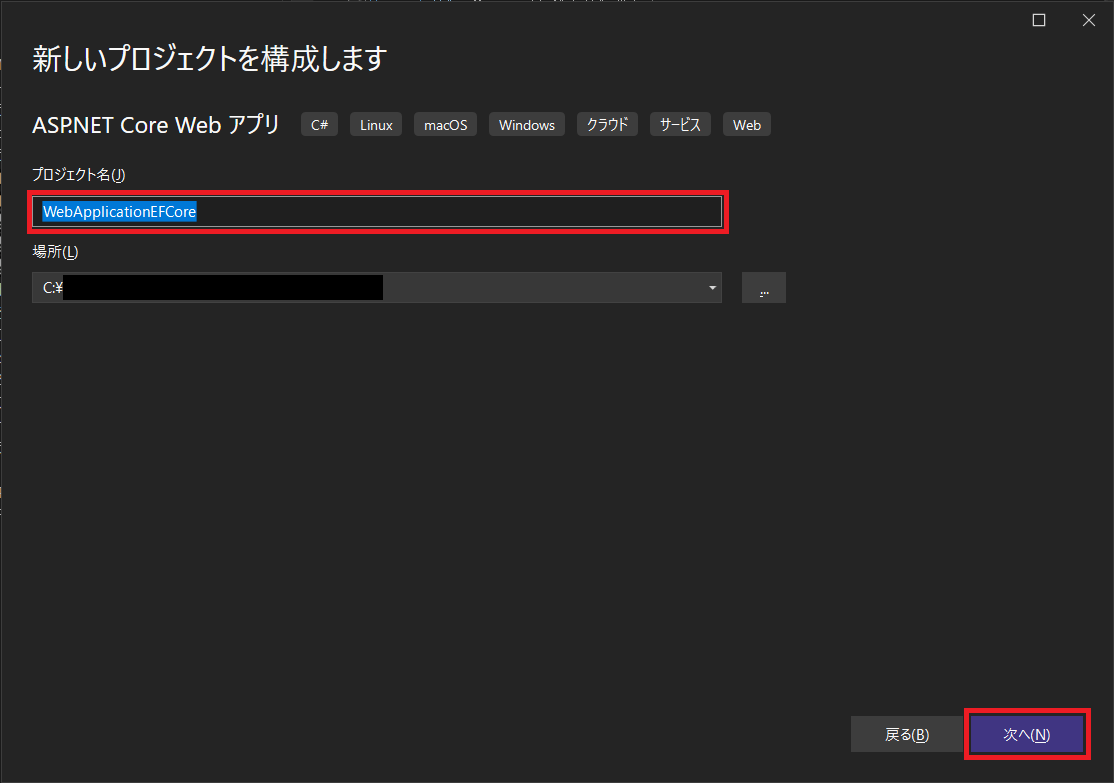
プロジェクト作成
プロジェクトテンプレートは「ASP.NET Core Webアプリ(Model-View-Controller)」を選択します。
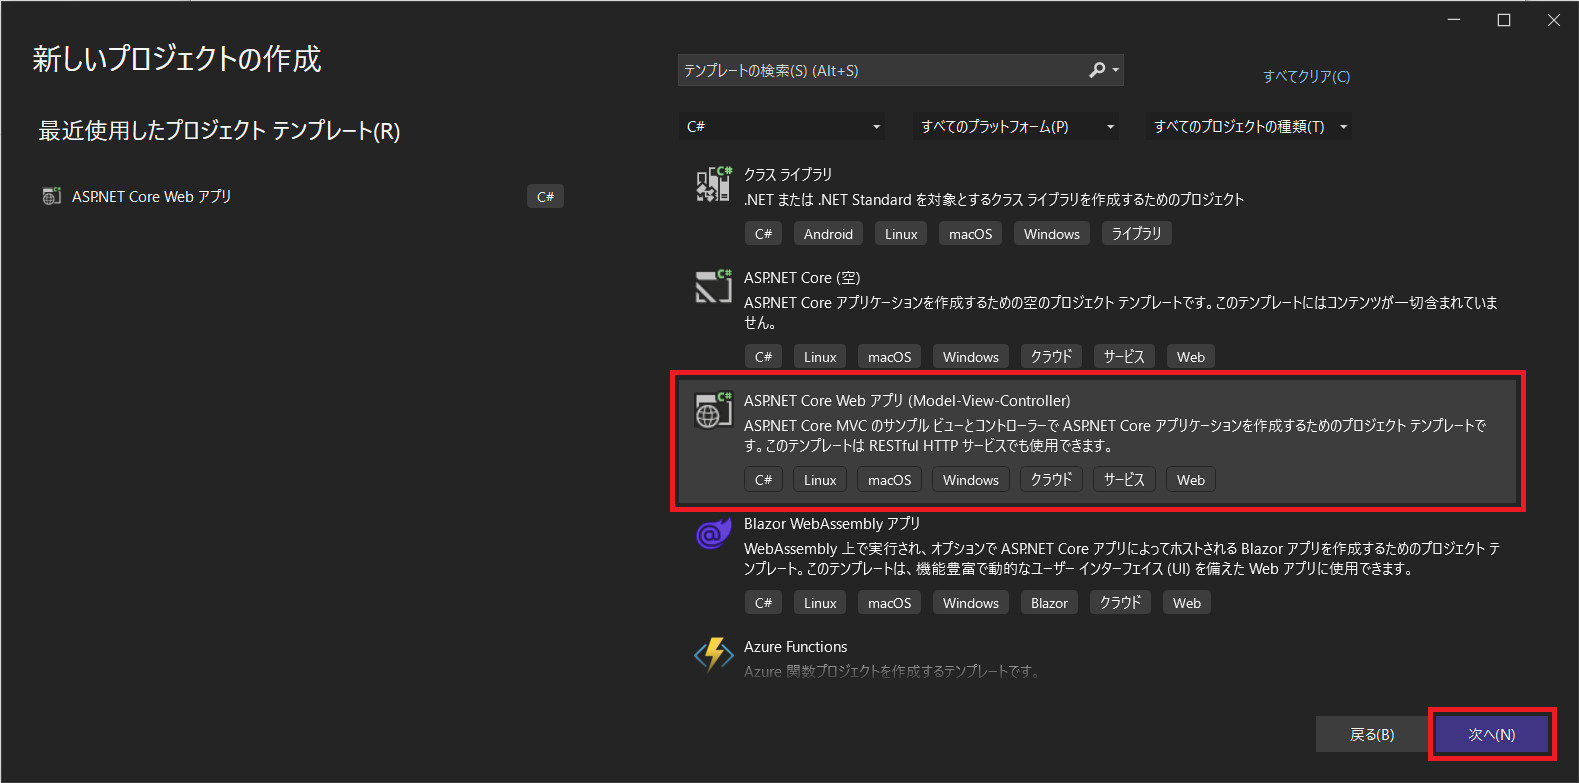
プロジェクト名はWebApplicationEFCoreにします。
Webサイトのスタイル設定
サイトのホームページ、レイアウト、メニューを設定します。
スタイル変更前(デフォルト)

スタイル変更後

サイトのホームページを設定します。
Views\Home\Index.cshtmlを下記の内容に置き換えます。
@{
ViewData["Title"] = "Home Page";
}
<div class="jumbotron">
<h1>Contoso University</h1>
</div>
<div class="row">
<div class="col-md-4">
<h2>Welcome to Contoso University</h2>
<p>
Contoso University is a sample application that
demonstrates how to use Entity Framework Core in an
ASP.NET Core MVC web application.
</p>
</div>
<div class="col-md-4">
<h2>Build it from scratch</h2>
<p>You can build the application by following the steps in a series of tutorials.</p>
<p><a class="btn btn-default" href="https://docs.asp.net/en/latest/data/ef-mvc/intro.html">See the tutorial »</a></p>
</div>
<div class="col-md-4">
<h2>Download it</h2>
<p>You can download the completed project from GitHub.</p>
<p><a class="btn btn-default" href="https://github.com/dotnet/AspNetCore.Docs/tree/main/aspnetcore/data/ef-mvc/intro/samples/5cu-final">See project source code »</a></p>
</div>
</div>
サイトのヘッダーを設定します。
Views\Shared\_Layout.cshtmlを下記のように修正します。
<!DOCTYPE html>
<html lang="en">
<head>
<meta charset="utf-8" />
<meta name="viewport" content="width=device-width, initial-scale=1.0" />
- <title>@ViewData["Title"] - WebApplicationEFCore</title>
+ <title>@ViewData["Title"] - Contoso University</title>
<link rel="stylesheet" href="~/lib/bootstrap/dist/css/bootstrap.min.css" />
<link rel="stylesheet" href="~/css/site.css" asp-append-version="true" />
<link rel="stylesheet" href="~/WebApplicationEFCore.styles.css" asp-append-version="true" />
</head>
<body>
<header>
<nav class="navbar navbar-expand-sm navbar-toggleable-sm navbar-light bg-white border-bottom box-shadow mb-3">
<div class="container-fluid">
<a class="navbar-brand" asp-area="" asp-controller="Home" asp-action="Index">WebApplicationEFCore</a>
<button class="navbar-toggler" type="button" data-bs-toggle="collapse" data-bs-target=".navbar-collapse" aria-controls="navbarSupportedContent"
aria-expanded="false" aria-label="Toggle navigation">
<span class="navbar-toggler-icon"></span>
</button>
<div class="navbar-collapse collapse d-sm-inline-flex justify-content-between">
<ul class="navbar-nav flex-grow-1">
<li class="nav-item">
<a class="nav-link text-dark" asp-area="" asp-controller="Home" asp-action="Index">Home</a>
</li>
<li class="nav-item">
<a class="nav-link text-dark" asp-area="" asp-controller="Home" asp-action="Privacy">Privacy</a>
</li>
+ <li class="nav-item">
+ <a class="nav-link text-dark" asp-area="" asp-controller="Home" asp-action="About">About</a>
+ </li>
+ <li class="nav-item">
+ <a class="nav-link text-dark" asp-area="" asp-controller="Students" asp-action="Index">Students</a>
+ </li>
+ <li class="nav-item">
+ <a class="nav-link text-dark" asp-area="" asp-controller="Courses" asp-action="Index">Courses</a>
+ </li>
+ <li class="nav-item">
+ <a class="nav-link text-dark" asp-area="" asp-controller="Instructors" asp-action="Index">Instructors</a>
+ </li>
+ <li class="nav-item">
+ <a class="nav-link text-dark" asp-area="" asp-controller="Departments" asp-action="Index">Departments</a>
+ </li>
</ul>
</div>
</div>
</nav>
</header>
<div class="container">
<main role="main" class="pb-3">
@RenderBody()
</main>
</div>
<footer class="border-top footer text-muted">
<div class="container">
- © 2023 - WebApplicationEFCore - <a asp-area="" asp-controller="Home" asp-action="Privacy">Privacy</a>
+ © 2023 - Contoso University - <a asp-area="" asp-controller="Home" asp-action="Privacy">Privacy</a>
</div>
</footer>
<script src="~/lib/jquery/dist/jquery.min.js"></script>
<script src="~/lib/bootstrap/dist/js/bootstrap.bundle.min.js"></script>
<script src="~/js/site.js" asp-append-version="true"></script>
@await RenderSectionAsync("Scripts", required: false)
</body>
</html>
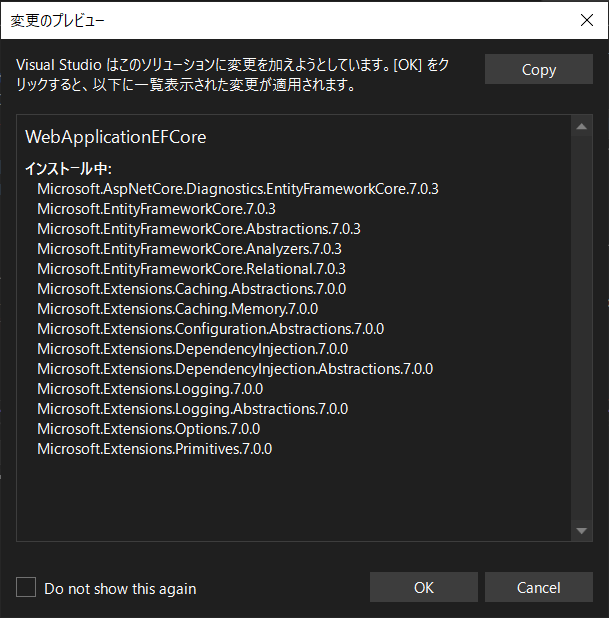
EF Coreのインストール
NuGetで下記のパッケージをインストールします。
| パッケージ | 説明 |
|---|---|
| Microsoft.AspNetCore.Diagnostics.EntityFrameworkCore | EF Core移行に関するエラー検出 |
| Microsoft.EntityFrameworkCore.SqlServer | SQL Serverのプロパイダ |
Microsoft.AspNetCore.Diagnostics.EntityFrameworkCoreのパッケージには
Microsoft.EntityFrameworkCoreが含まれてます。
モデルクラスの作成
Modelsフォルダにエンティティのクラスを作成します。

Models
 ├─ Course.cs         // 新規に追加する
 ├─ Enrollment.cs     // 新規に追加する
 ├─ ErrorViewModel.cs // デフォルトからある
 └─ Student.cs        // 新規に追加する
Models\Student.cs
namespace WebApplicationEFCore.Models
{
    public class Student
    {
        public int ID { get; set; }
        public string LastName { get; set; }
        public string FirstMidName { get; set; }
        public DateTime EnrollmentDate { get; set; }
    }
}
Models\Enrollment.cs
namespace WebApplicationEFCore.Models
{
    public enum Grade
    {
        A, B, C, D, F
    }

    public class Enrollment
    {
        public int EnrollmentID { get; set; }
        public int CourseID { get; set; }
        public int StudentID { get; set; }
        public Grade? Grade { get; set; }
    }
}
Models\Course.cs
namespace WebApplicationEFCore.Models
{
    public class Course
    {
        public int CourseID { get; set; }
        public string Title { get; set; }
        public int Credits { get; set; }
    }
}
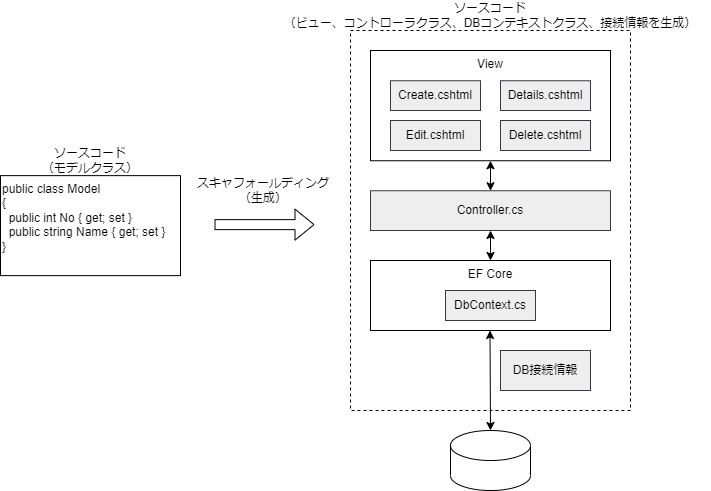
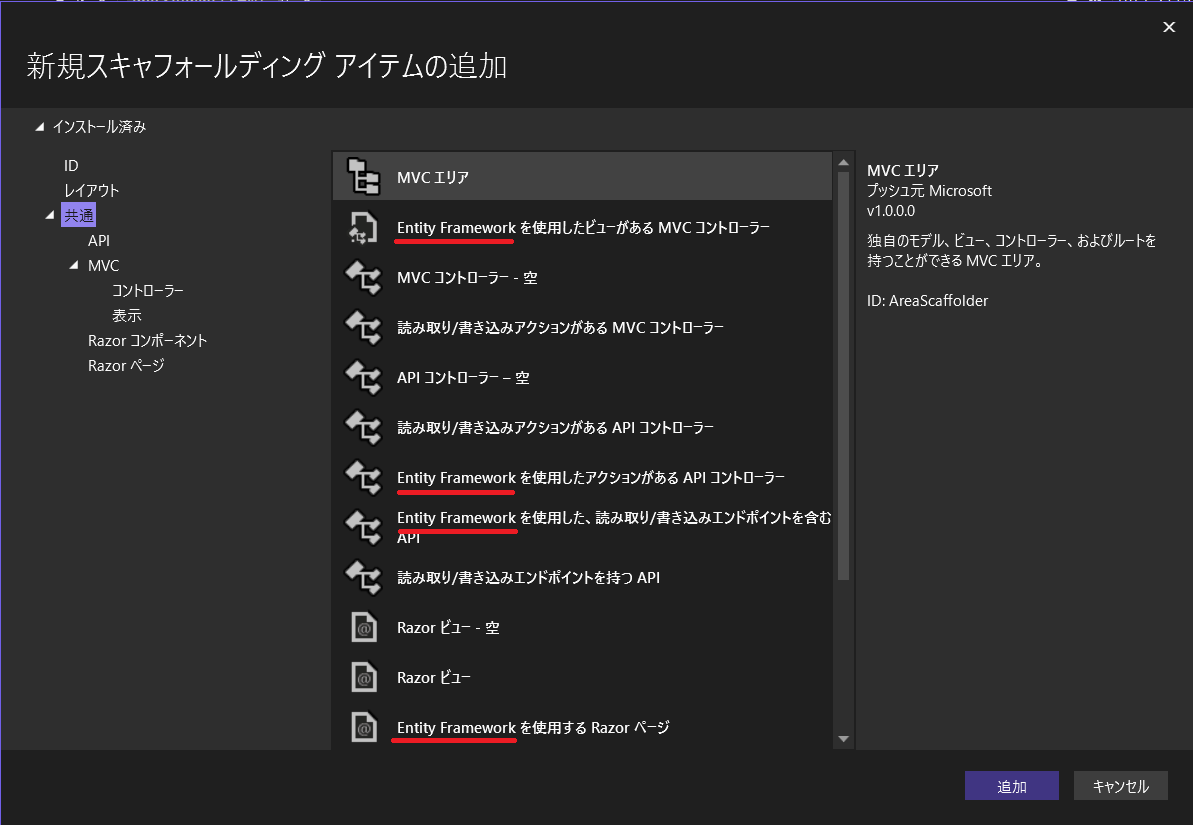
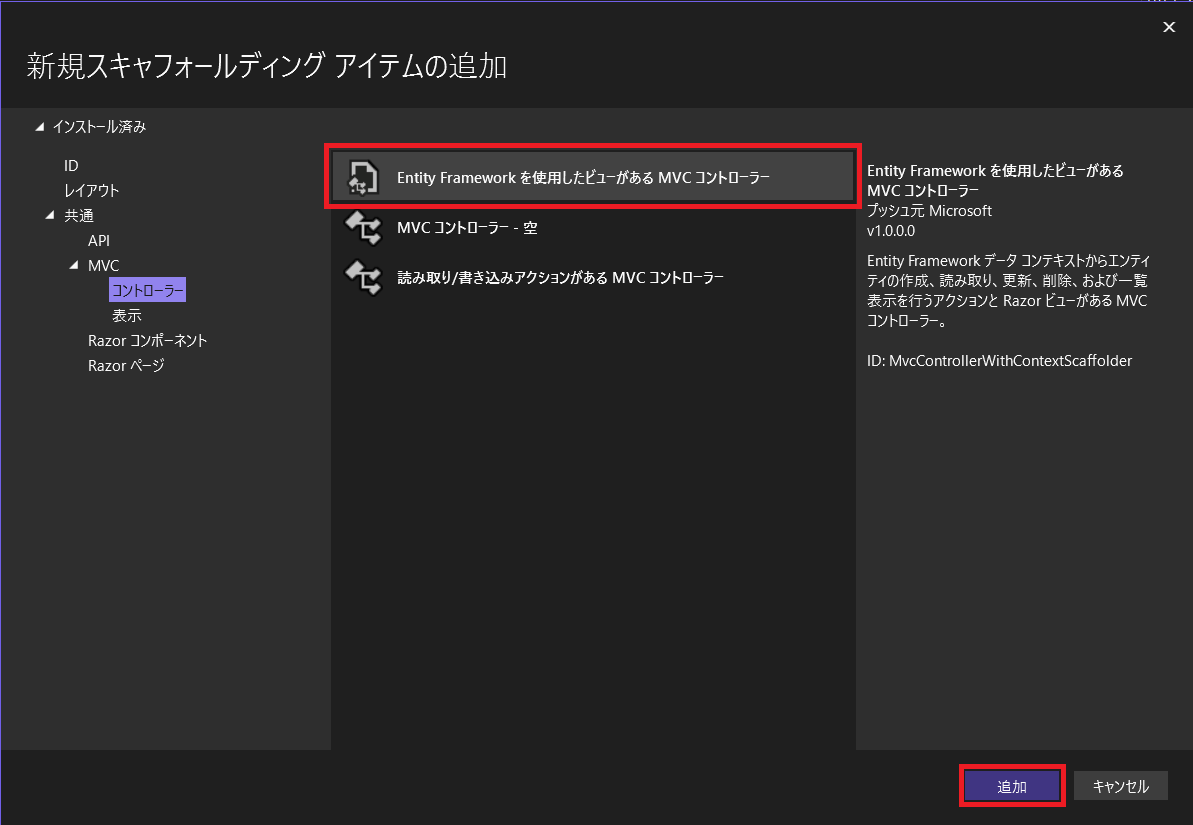
スキャフォールディングで自動生成
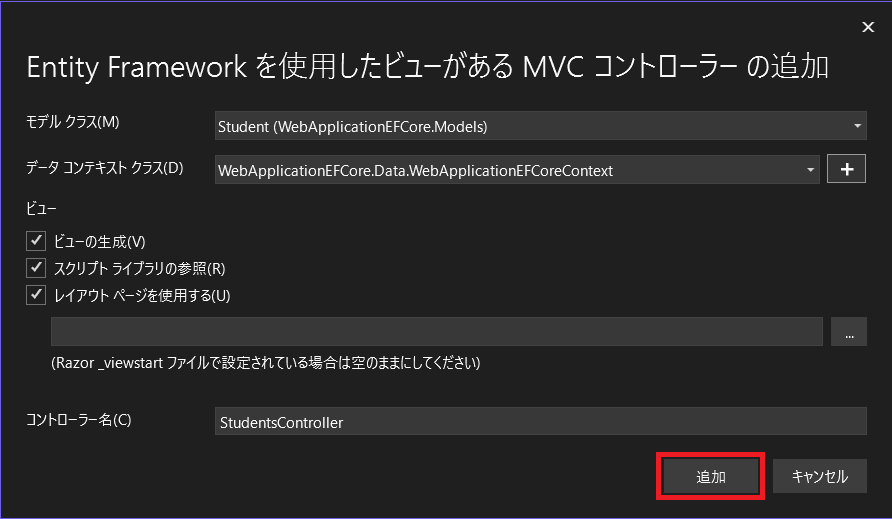
ASP.NET Coreのスキャフォールディングで、DBのStudentテーブルを、画面操作でCRUDできるようにファイルを自動生成します。
Visual StudioのソリューションエクスプローラーでControllersフォルダを右クリックして、
「追加」>「新規スキャフォールディングアイテム」を選択します。

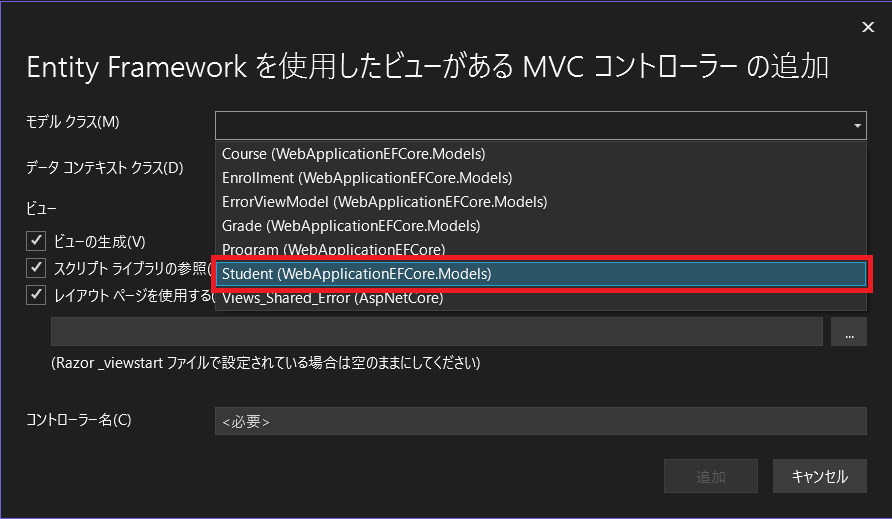
「Entity Frameworkを使用したビューがあるMVCコントローラー」を選択します。
作成元となるモデルクラスを、ドロップダウンリストからStudentクラスを選択します。
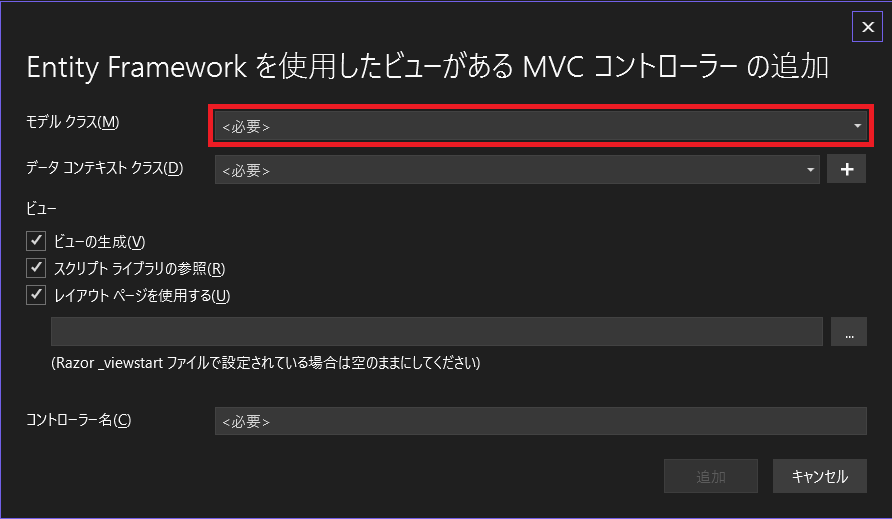
コントローラー名は自動補完してくれます。
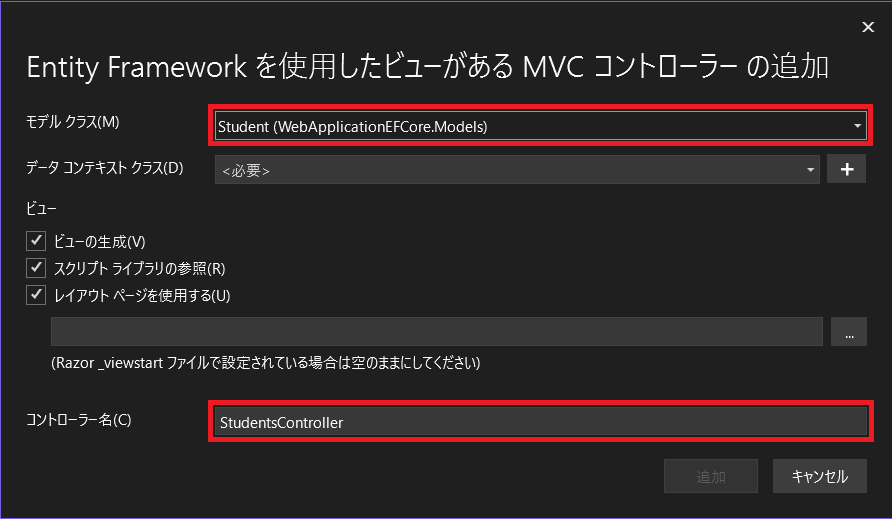
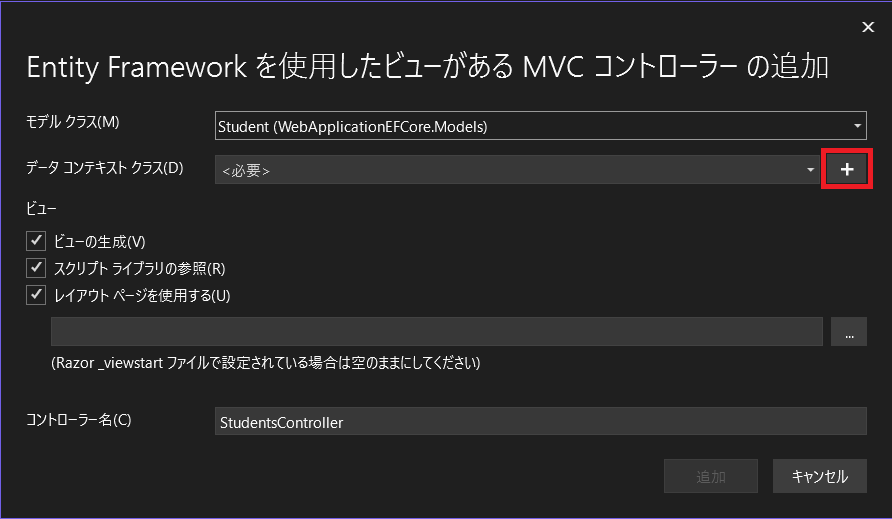
データコンテキストのクラス名は自動補完してくれます。
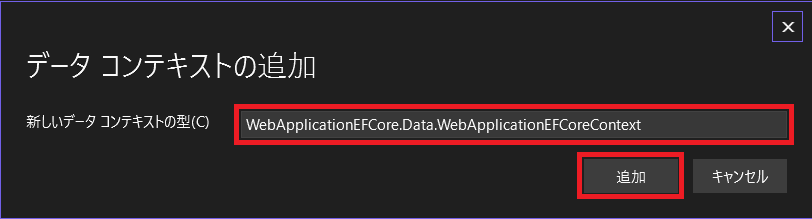
「追加」をクリックすると、自動生成されます。
スキャフォールディング後は下記のようになります。
/
├─ Controllers
|  └─ StudentsController.cs // 追加
├─ Data
|  └─ WebApplicationEFCoreContext.cs // 追加
├─ Views
|  └─ Students
|     ├─ Create.cshtml  // 追加
|     ├─ Delete.cshtml  // 追加
|     ├─ Details.cshtml // 追加
|     ├─ Edit.cshtml    // 追加
|     └─ Index.cshtml   // 追加
├─ appsettings.json // 変更
└─ Program.cs       // 変更
-
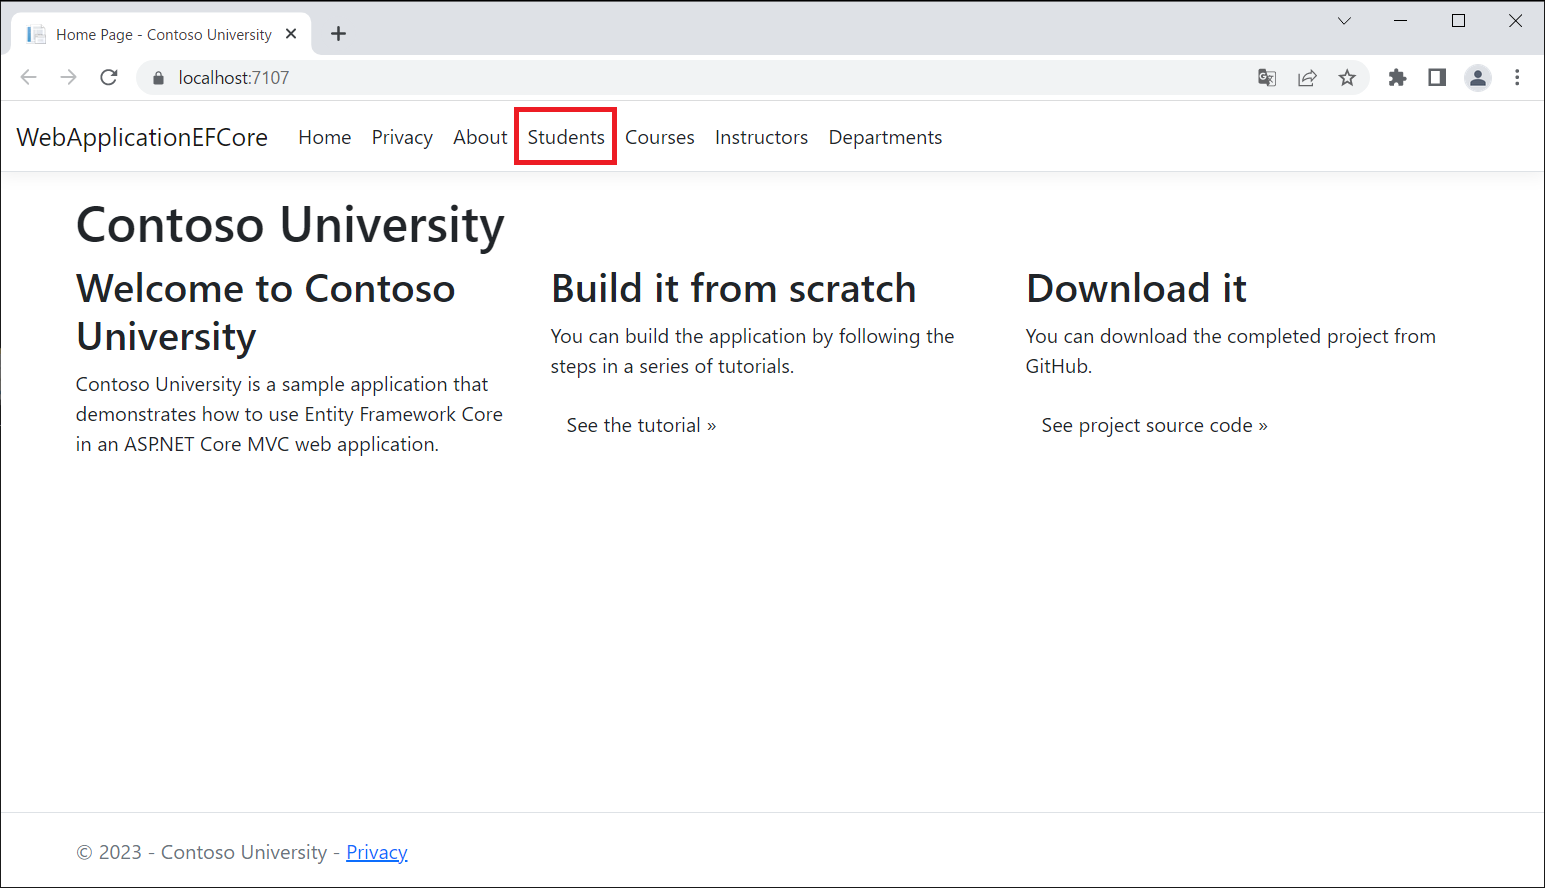
StudentテーブルのCRUD用のコントローラークラスControllers\StudentsController.cs、ビューファイルViews\Students\*.cshtmlが追加されます。
これにより、サイトのヘッダーにある「Students」をクリックするとControllers\StudentsController.csが呼び出され、CRUDの操作画面と紐付きます。
-
appsettings.jsonにデータベースへの接続情報が追記されます。
{
  "Logging": {
    "LogLevel": {
      "Default": "Information",
      "Microsoft.AspNetCore": "Warning"
    }
  },
  "AllowedHosts": "*",
+  "ConnectionStrings": {
+    "WebApplicationEFCoreContext": "Server=(localdb)\\mssqllocaldb;Database=WebApplicationEFCoreContext-1b96a727-f6dd-48ca-933e-fbfbe82af641;Trusted_Connection=True;MultipleActiveResultSets=true"
+  }
}
- データコンテキストクラス
Data\WebApplicationEFCoreContext.csが追加されます。
using System;
using System.Collections.Generic;
using System.Linq;
using System.Threading.Tasks;
using Microsoft.EntityFrameworkCore;
using WebApplicationEFCore.Models;

namespace WebApplicationEFCore.Data
{
    public class WebApplicationEFCoreContext : DbContext
    {
        public WebApplicationEFCoreContext (DbContextOptions<WebApplicationEFCoreContext> options)
            : base(options)
        {
        }

        public DbSet<WebApplicationEFCore.Models.Student> Student { get; set; } = default!;
    }
}
Program.csでデータコンテキストクラスをDIコンテナに追加します。
+ using Microsoft.EntityFrameworkCore;
+ using Microsoft.Extensions.DependencyInjection;
+ using WebApplicationEFCore.Data;
namespace WebApplicationEFCore
{
    public class Program
    {
        public static void Main(string[] args)
        {
            var builder = WebApplication.CreateBuilder(args);
+            builder.Services.AddDbContext<WebApplicationEFCoreContext>(options =>
+                options.UseSqlServer(builder.Configuration.GetConnectionString("WebApplicationEFCoreContext") ?? throw new InvalidOperationException("Connection string 'WebApplicationEFCoreContext' not found.")));

            // Add services to the container.
            builder.Services.AddControllersWithViews();

            var app = builder.Build();

            // Configure the HTTP request pipeline.
            if (!app.Environment.IsDevelopment())
            {
                app.UseExceptionHandler("/Home/Error");
                // The default HSTS value is 30 days. You may want to change this for production scenarios, see https://aka.ms/aspnetcore-hsts.
                app.UseHsts();
            }

            app.UseHttpsRedirection();
            app.UseStaticFiles();

            app.UseRouting();

            app.UseAuthorization();

            app.MapControllerRoute(
                name: "default",
                pattern: "{controller=Home}/{action=Index}/{id?}");

            app.Run();
        }
    }
}
- 自動生成されたコントローラークラス
Controllers\StudentsController.csで、注入したデータコンテキストクラス経由でDB操作を行います。
namespace WebApplicationEFCore.Controllers
{
    public class StudentsController : Controller
    {
        private readonly WebApplicationEFCoreContext _context;

        public StudentsController(WebApplicationEFCoreContext context)
        {
            _context = context;
        }

        // GET: Students
        public async Task<IActionResult> Index()
        {
              return _context.Student != null ?
                          View(await _context.Student.ToListAsync()) :
                          Problem("Entity set 'WebApplicationEFCoreContext.Student'  is null.");
        }
        ~~~ 省略 ~~~
    }
}
データベース設定
データベース例外フィルターの追加
EF Coreへの移行時にエラーが発生した場合、解決案をHTMLで返すように、Program.csでAddDatabaseDeveloperPageExceptionFilter()メソッドを呼び出します。(未検証)
using Microsoft.EntityFrameworkCore;
using Microsoft.Extensions.DependencyInjection;
using WebApplicationEFCore.Data;
namespace WebApplicationEFCore
{
    public class Program
    {
        public static void Main(string[] args)
        {
            var builder = WebApplication.CreateBuilder(args);
            builder.Services.AddDbContext<WebApplicationEFCoreContext>(options =>
                options.UseSqlServer(builder.Configuration.GetConnectionString("WebApplicationEFCoreContext") ?? throw new InvalidOperationException("Connection string 'WebApplicationEFCoreContext' not found.")));

+            builder.Services.AddDatabaseDeveloperPageExceptionFilter();

            // Add services to the container.
            builder.Services.AddControllersWithViews();

            var app = builder.Build();

            // Configure the HTTP request pipeline.
            if (!app.Environment.IsDevelopment())
            {
                app.UseExceptionHandler("/Home/Error");
                // The default HSTS value is 30 days. You may want to change this for production scenarios, see https://aka.ms/aspnetcore-hsts.
                app.UseHsts();
            }

            app.UseHttpsRedirection();
            app.UseStaticFiles();

            app.UseRouting();

            app.UseAuthorization();

            app.MapControllerRoute(
                name: "default",
                pattern: "{controller=Home}/{action=Index}/{id?}");

            app.Run();
        }
    }
}
データコンテキストクラスの修正
データコンテキストクラスData\WebApplicationEFCoreContext.csにCourseテーブルとEnrollmentテーブルを追加します。
EF CoreはデフォルトでDbSetのプロパティ名からテーブル名を作成しますが、
今回は、DbSetのプロパティ名は複数形、テーブル名は単数形と別名にします。
OnModelCreating()メソッドで下記のようにすると、DbSetのプロパティ名とテーブル名を別名に定義できます。
using Microsoft.EntityFrameworkCore;
using WebApplicationEFCore.Models;

namespace WebApplicationEFCore.Data
{
    public class WebApplicationEFCoreContext : DbContext
    {
        public WebApplicationEFCoreContext (DbContextOptions<WebApplicationEFCoreContext> options)
            : base(options)
        {
        }

+        public DbSet<Course> Courses { get; set; } = default!;
+        public DbSet<Enrollment> Enrollments { get; set; } = default!;
-        public DbSet<Student> Student { get; set; } = default!;
+        public DbSet<Student> Students { get; set; } = default!;  // ★★★単数形「Student」を複数形「Students」にする★★★

+        protected override void OnModelCreating(ModelBuilder modelBuilder)
+        {
+            modelBuilder.Entity<Course>().ToTable("Course");
+            modelBuilder.Entity<Enrollment>().ToTable("Enrollment");
+            modelBuilder.Entity<Student>().ToTable("Student");
+        }
    }
}
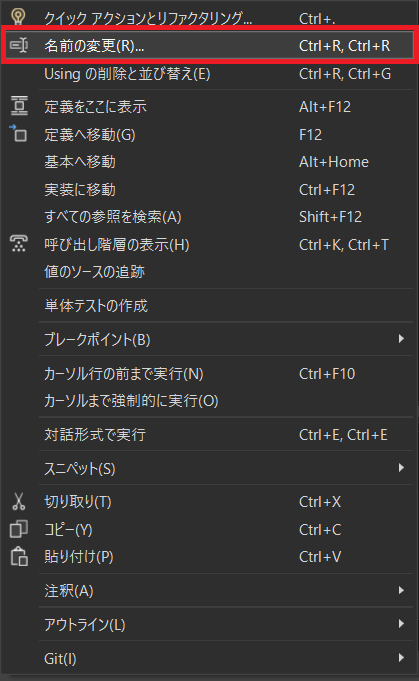
DbSetのプロパティ名をStudentからStudentsに変更する場合は、
Studentプロパティを右クリックして「名前の変更」で変更すると、影響範囲のコントローラークラスも修正してくるので便利です。
データを投入するクラスの追加
データベースにデータを投入するクラスData\DbInitializer.csを追加します。
using WebApplicationEFCore.Models;

namespace WebApplicationEFCore.Data
{
    public static class DbInitializer
    {
        public static void Initialize(WebApplicationEFCoreContext context)
        {
            context.Database.EnsureCreated();

            // Look for any students.
            if (context.Students.Any())
            {
                return;   // DB has been seeded
            }

            var students = new Student[]
            {
                new Student{FirstMidName="Carson",LastName="Alexander",    EnrollmentDate=DateTime.Parse("2005-09-01")},
                new Student{FirstMidName="Meredith",LastName="Alonso",    EnrollmentDate=DateTime.Parse("2002-09-01")},
                new Student{FirstMidName="Arturo",LastName="Anand",    EnrollmentDate=DateTime.Parse("2003-09-01")},
                new Student{FirstMidName="Gytis",LastName="Barzdukas",    EnrollmentDate=DateTime.Parse("2002-09-01")},
                new Student{FirstMidName="Yan",LastName="Li",    EnrollmentDate=DateTime.Parse("2002-09-01")},
                new Student{FirstMidName="Peggy",LastName="Justice",    EnrollmentDate=DateTime.Parse("2001-09-01")},
                new Student{FirstMidName="Laura",LastName="Norman",    EnrollmentDate=DateTime.Parse("2003-09-01")},
                new Student{FirstMidName="Nino",LastName="Olivetto",    EnrollmentDate=DateTime.Parse("2005-09-01")}
            };
            foreach (Student s in students)
            {
                context.Students.Add(s);
            }
            context.SaveChanges();

            var courses = new Course[]
            {
                new Course{Title="Chemistry",Credits=3},
                new Course{Title="Microeconomics",Credits=3},
                new Course{Title="Macroeconomics",Credits=3},
                new Course{Title="Calculus",Credits=4},
                new Course{Title="Trigonometry",Credits=4},
                new Course{Title="Composition",Credits=3},
                new Course{Title="Literature",Credits=4}
            };
            foreach (Course c in courses)
            {
                context.Courses.Add(c);
            }
            context.SaveChanges();

            var enrollments = new Enrollment[]
            {
                new Enrollment{StudentID=1,CourseID=1050,Grade=Grade.A},
                new Enrollment{StudentID=1,CourseID=4022,Grade=Grade.C},
                new Enrollment{StudentID=1,CourseID=4041,Grade=Grade.B},
                new Enrollment{StudentID=2,CourseID=1045,Grade=Grade.B},
                new Enrollment{StudentID=2,CourseID=3141,Grade=Grade.F},
                new Enrollment{StudentID=2,CourseID=2021,Grade=Grade.F},
                new Enrollment{StudentID=3,CourseID=1050},
                new Enrollment{StudentID=4,CourseID=1050},
                new Enrollment{StudentID=4,CourseID=4022,Grade=Grade.F},
                new Enrollment{StudentID=5,CourseID=4041,Grade=Grade.C},
                new Enrollment{StudentID=6,CourseID=1045},
                new Enrollment{StudentID=7,CourseID=3141,Grade=Grade.A},
            };
            foreach (Enrollment e in enrollments)
            {
                context.Enrollments.Add(e);
            }
            context.SaveChanges();
        }
    }
}
アプリ起動時にデータ投入するように、上記で追加したDbInitializer.Initialize()メソッドをProgram.csで呼び出します。
using Microsoft.EntityFrameworkCore;
using WebApplicationEFCore.Data;
namespace WebApplicationEFCore
{
    public class Program
    {
        public static void Main(string[] args)
        {
            var builder = WebApplication.CreateBuilder(args);
            builder.Services.AddDbContext<WebApplicationEFCoreContext>(options =>
                options.UseSqlServer(builder.Configuration.GetConnectionString("WebApplicationEFCoreContext") ?? throw new InvalidOperationException("Connection string 'WebApplicationEFCoreContext' not found.")));

            builder.Services.AddDatabaseDeveloperPageExceptionFilter();

            // Add services to the container.
            builder.Services.AddControllersWithViews();

            var app = builder.Build();

            // Configure the HTTP request pipeline.
            if (!app.Environment.IsDevelopment())
            {
                app.UseExceptionHandler("/Home/Error");
                // The default HSTS value is 30 days. You may want to change this for production scenarios, see https://aka.ms/aspnetcore-hsts.
                app.UseHsts();
            }

            app.UseHttpsRedirection();
            app.UseStaticFiles();

            app.UseRouting();

            app.UseAuthorization();

            app.MapControllerRoute(
                name: "default",
                pattern: "{controller=Home}/{action=Index}/{id?}");

+            using (var scope = app.Services.CreateScope())
+            {
+                var services = scope.ServiceProvider;
+                try
+                {
+                    var context = services.GetRequiredService<WebApplicationEFCoreContext>();
+                    DbInitializer.Initialize(context);
+                }
+                catch (Exception ex)
+                {
+                    var logger = services.GetRequiredService<ILogger<Program>>();
+                    logger.LogError(ex, "An error occurred while seeding the database.");
+                }
+            }

            app.Run();
        }
    }
}
Webアプリの実行
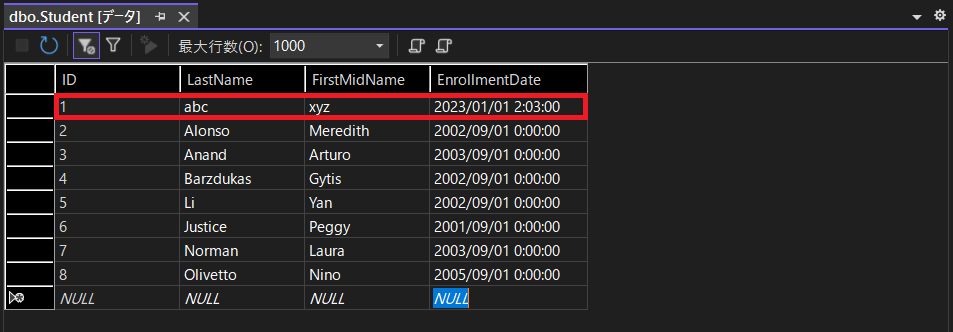
Visual StudioでデバッグF5実行して、「SQL Serverオブジェクトエクスプローラー」を開くと、テーブルが作成されており、
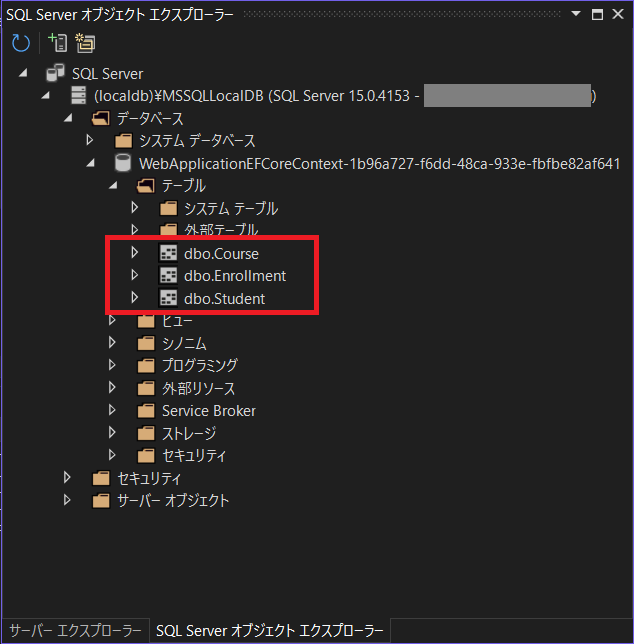
dbo.Studentを右クリックして「データの表示」を選択します。

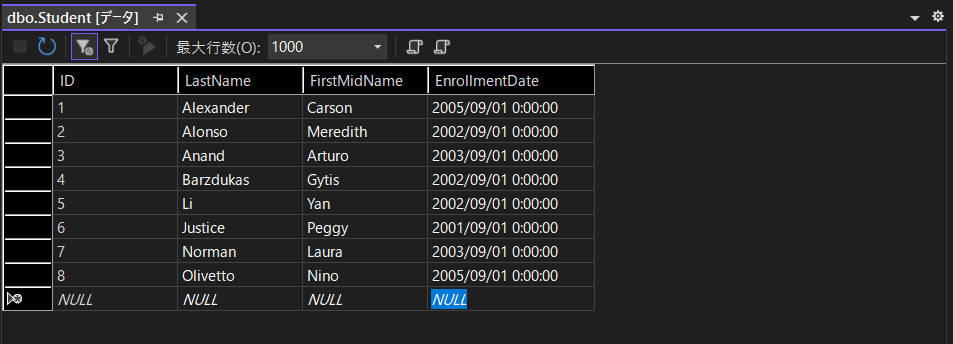
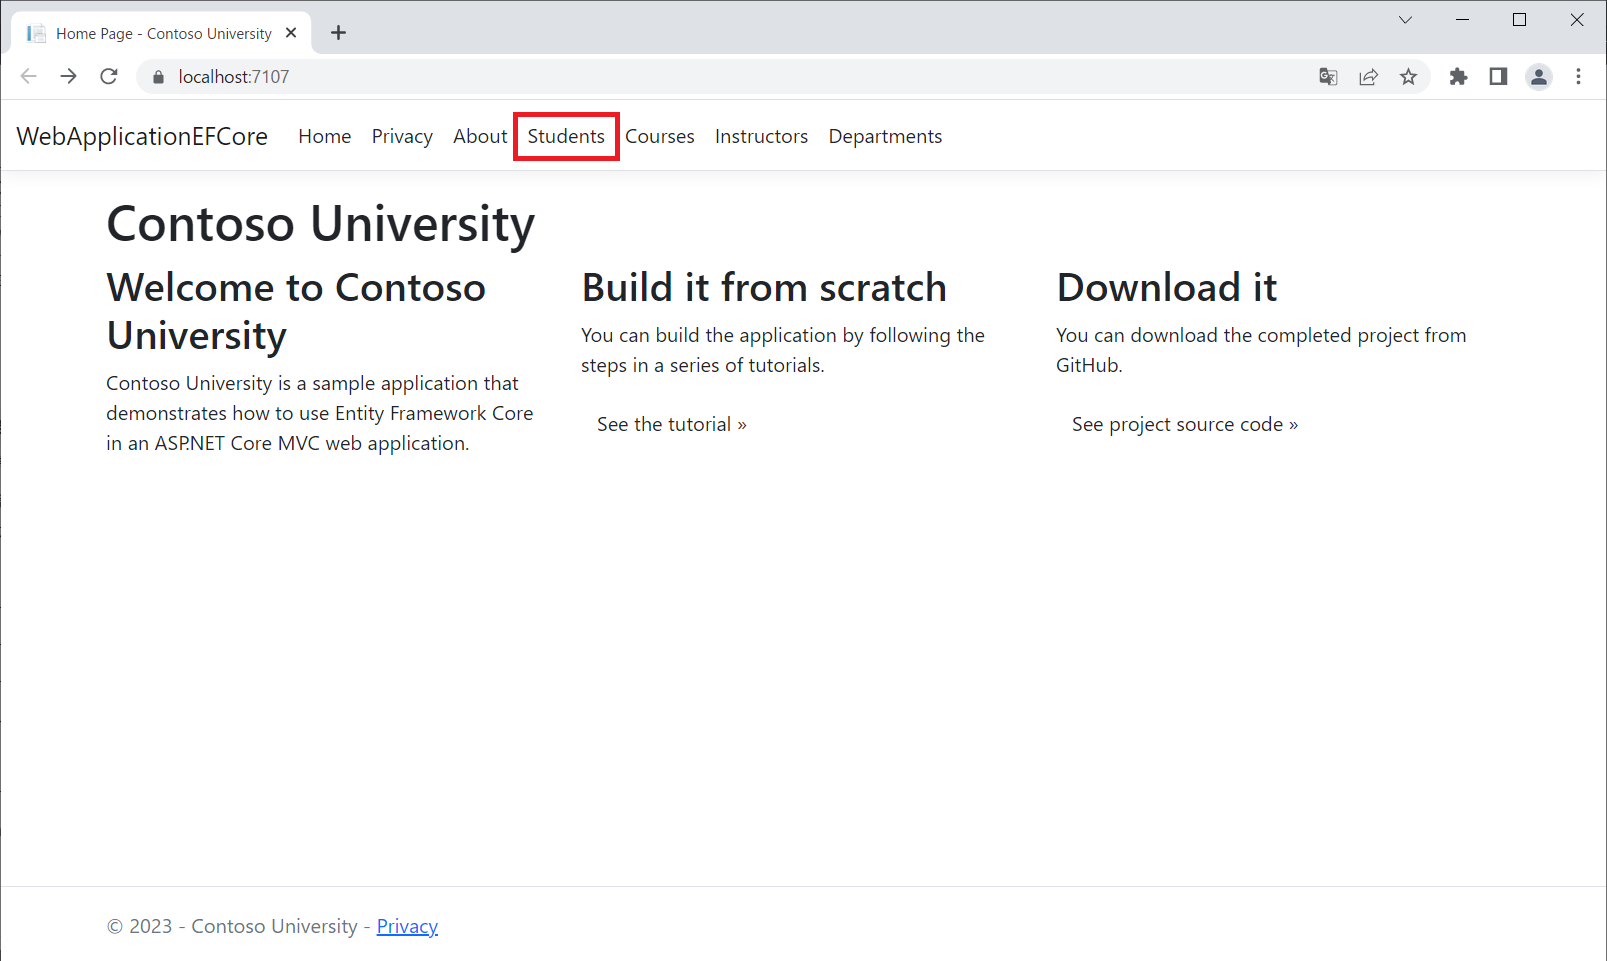
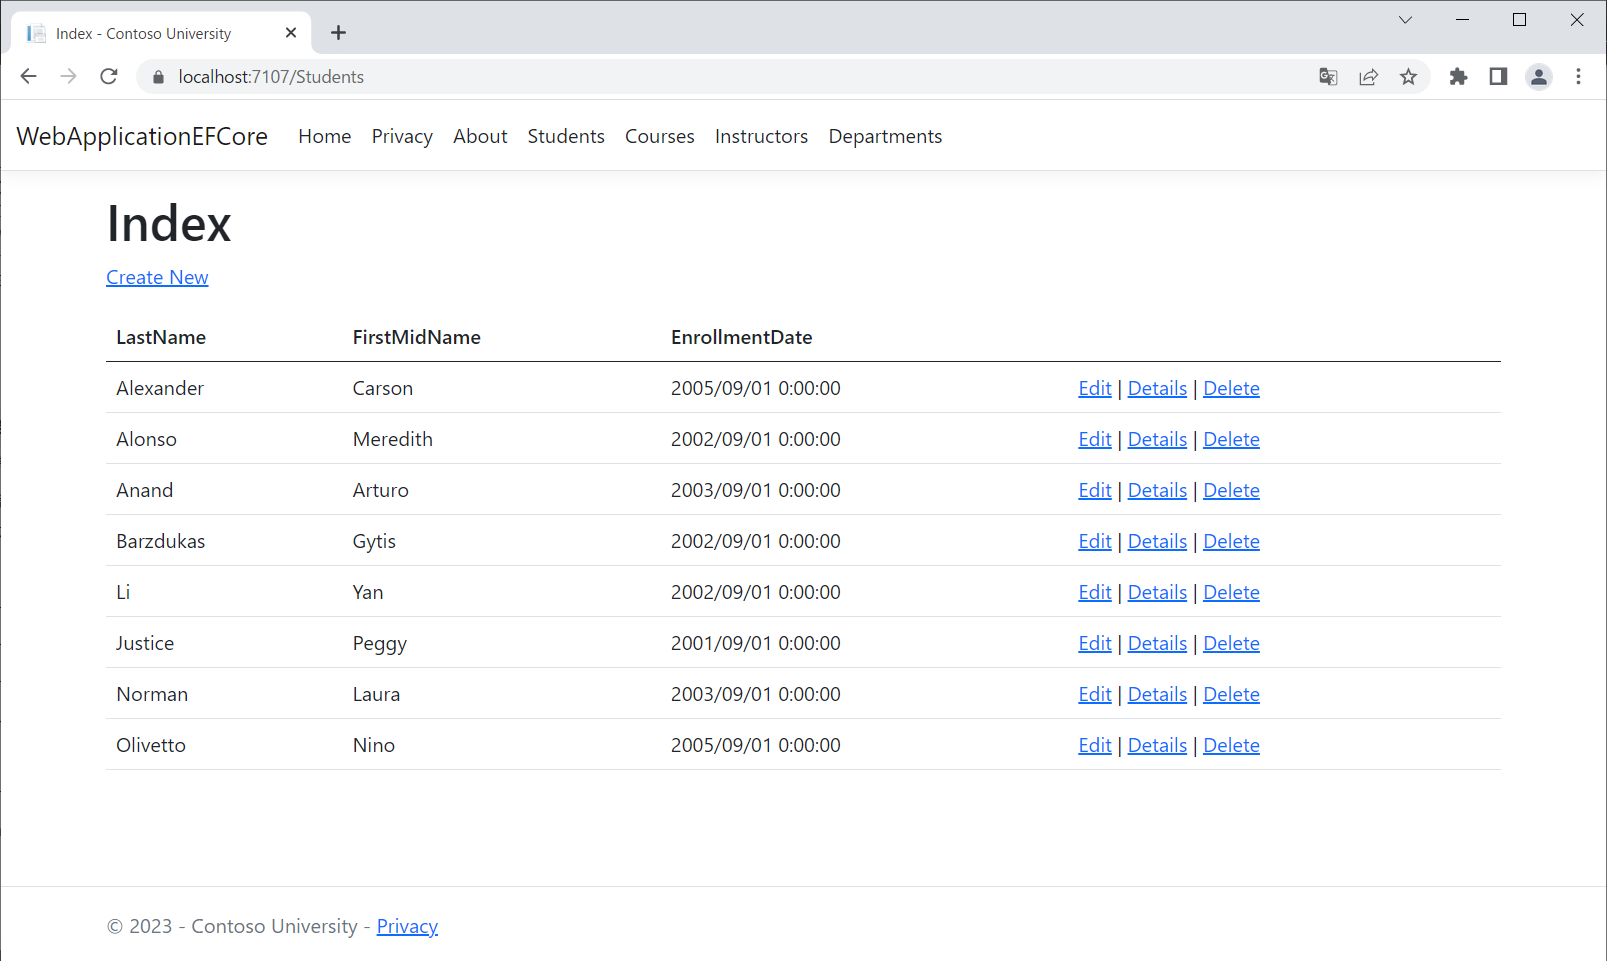
Studentテーブルの内容が、Webアプリで確認できます。
一番上のレコードの「Edit」をクリックして更新すると、
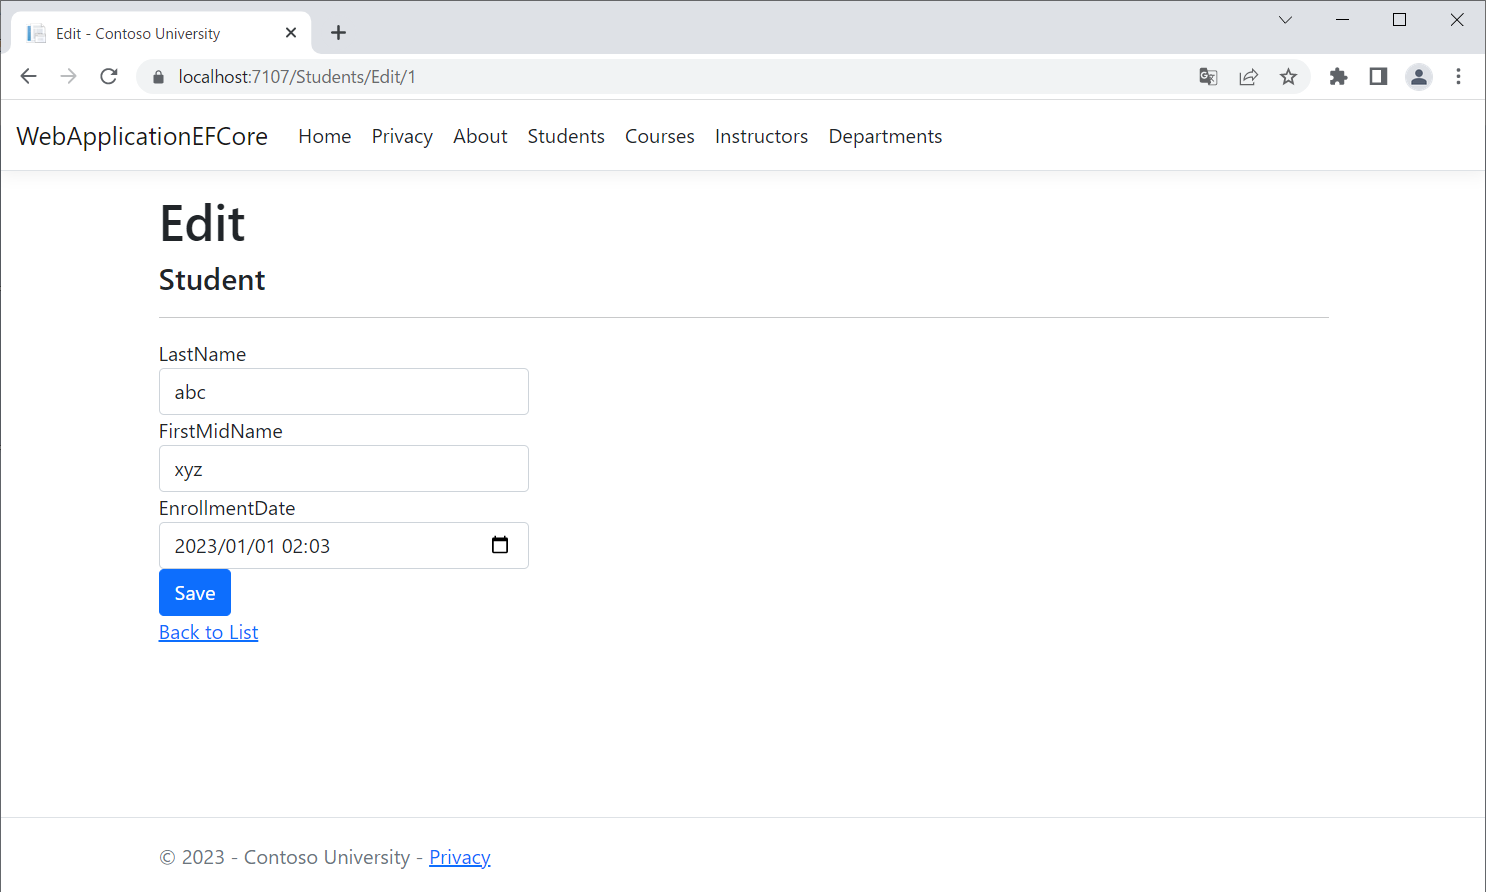
一覧も更新され、
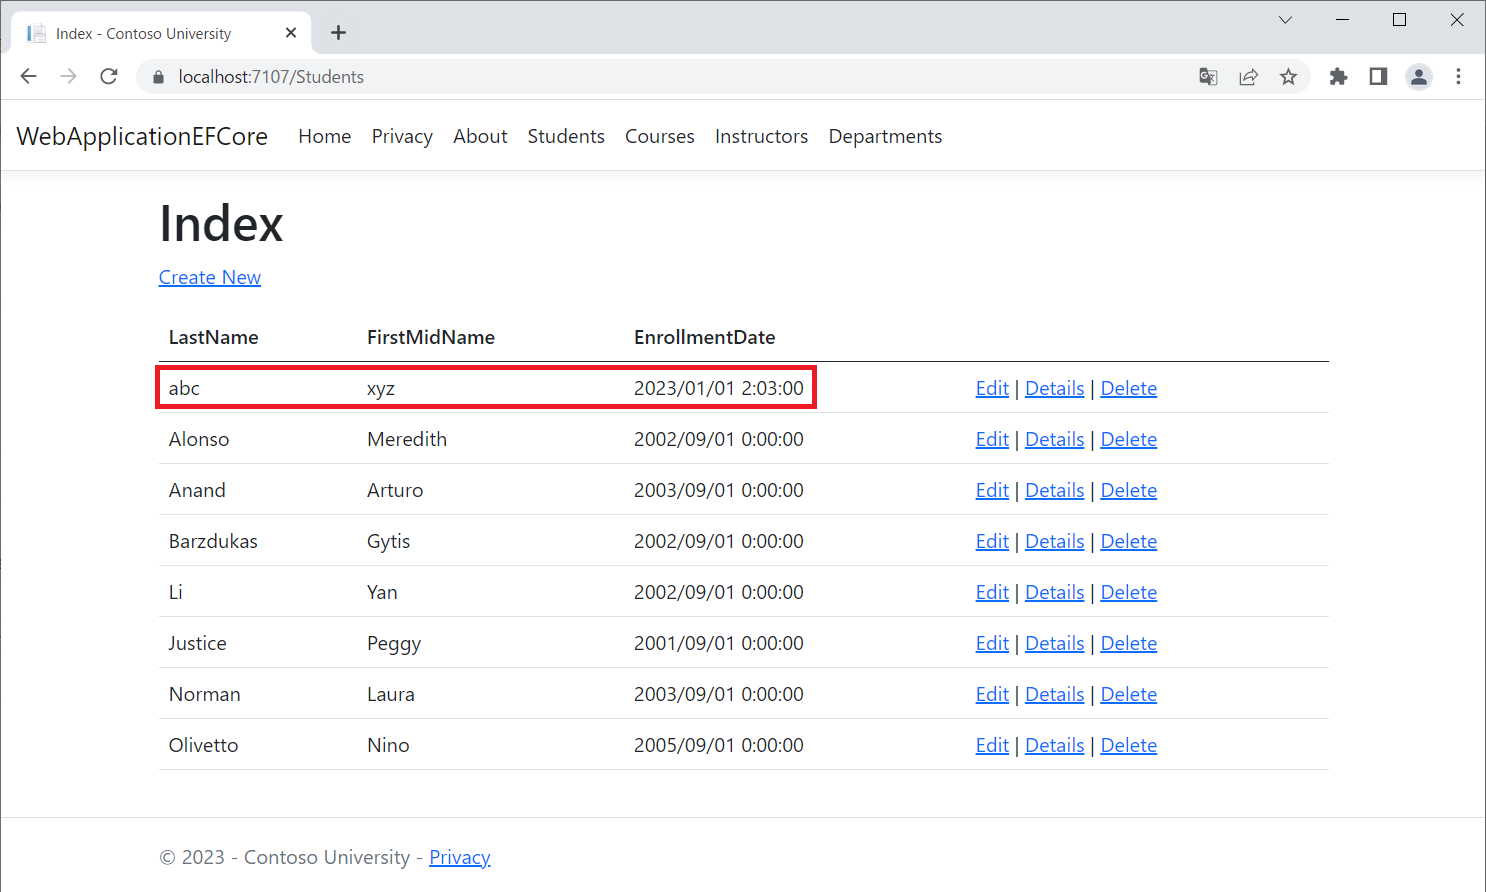
データベースと一致していることが分かります。
ヘッダーの「About」「Courses」「Instructors」「Departments」は、今回は実装しません。クリックすると404エラーとなります。

SQLクエリの確認
EF Coreが実行するSQLクエリは、デバッグコンソールに出力されます。
//「Student」一覧表示時の例
info: Microsoft.EntityFrameworkCore.Database.Command[20101]
      Executed DbCommand (6ms) [Parameters=[], CommandType='Text', CommandTimeout='30']
      SELECT [s].[ID], [s].[EnrollmentDate], [s].[FirstMidName], [s].[LastName]
      FROM [Student] AS [s]

//「Student」更新時の例
info: Microsoft.EntityFrameworkCore.Database.Command[20101]
      Executed DbCommand (4ms) [Parameters=[@p3='?' (DbType = Int32), @p0='?' (DbType = DateTime2), @p1='?' (Size = 4000), @p2='?' (Size = 4000)], CommandType='Text', CommandTimeout='30']
      SET IMPLICIT_TRANSACTIONS OFF;
      SET NOCOUNT ON;
      UPDATE [Student] SET [EnrollmentDate] = @p0, [FirstMidName] = @p1, [LastName] = @p2
      OUTPUT 1
      WHERE [ID] = @p3;
ソート、フィルター、ページング(ページネーション、ページャー)
- 一覧のタイトルヘッダーのリンクで、ソートする
- 検索ボックスで、フィルターする
- 「前へ」「次へ」ボタンで、ページングする
ページング用にページャークラスPaginatedList.csを新規に作成します。
当該ページのデータをDBから取得してリスト化してくれます。
using Microsoft.EntityFrameworkCore;

namespace WebApplicationEFCore
{
    public class PaginatedList<T> : List<T>
    {
        public int PageIndex { get; private set; }
        public int TotalPages { get; private set; }

        public PaginatedList(List<T> items, int count, int pageIndex, int pageSize)
        {
            PageIndex = pageIndex;
            TotalPages = (int)Math.Ceiling(count / (double)pageSize);

            this.AddRange(items);
        }

        public bool HasPreviousPage => PageIndex > 1;

        public bool HasNextPage => PageIndex < TotalPages;

        public static async Task<PaginatedList<T>> CreateAsync(IQueryable<T> source, int pageIndex, int pageSize)
        {
            var count = await source.CountAsync();
            var items = await source.Skip((pageIndex - 1) * pageSize).Take(pageSize).ToListAsync();
            return new PaginatedList<T>(items, count, pageIndex, pageSize);
        }
    }
}
Views\Students\Index.cshtml
- ヘッダーをリンク化して、コントローラークラスでソートできるようにします。
nameの検索ボックスを追加して、コントローラークラスでフィルターできるようにします。Previous、Nextボタンを追加して、コントローラークラスでページングできるようにします。
<!-- ★★★ページング対応★★★ -->
-@model IEnumerable<WebApplicationEFCore.Models.Student>
+@model PaginatedList<WebApplicationEFCore.Models.Student>

@{
    ViewData["Title"] = "Index";
}

<h1>Index</h1>

<p>
    <a asp-action="Create">Create New</a>
</p>

<!-- ★★★フィルター対応★★★ -->
+<form asp-action="Index" method="get">
+    <div class="form-actions no-color">
+        <p>
+            Find by name: <input type="text" name="SearchString" value="@ViewData["CurrentFilter"]" />
+            <input type="submit" value="Search" class="btn btn-default" /> |
+            <a asp-action="Index">Back to Full List</a>
+        </p>
+    </div>
+</form>

<table class="table">
    <thead>
        <tr>
            <th>
         <!-- ★★★ソート対応、ページング対応★★★ -->
-                @Html.DisplayNameFor(model => model.LastName)
+                <a asp-action="Index" asp-route-sortOrder="@ViewData["NameSortParm"]" asp-route-currentFilter="@ViewData["CurrentFilter"]">Last Name</a>
            </th>
            <th>
         <!-- ★★★ページング対応(ページャークラスにしたためハードコーディング)★★★ -->
-                @Html.DisplayNameFor(model => model.FirstMidName)
+                First Name
            </th>
            <th>
         <!-- ★★★ソート対応、ページング対応★★★ -->
-                @Html.DisplayNameFor(model => model.EnrollmentDate)
+                <a asp-action="Index" asp-route-sortOrder="@ViewData["DateSortParm"]" asp-route-currentFilter="@ViewData["CurrentFilter"]">Enrollment Date</a>
            </th>
            <th></th>
        </tr>
    </thead>
    <tbody>
        @foreach (var item in Model)
        {
            <tr>
                <td>
                    @Html.DisplayFor(modelItem => item.LastName)
                </td>
                <td>
                    @Html.DisplayFor(modelItem => item.FirstMidName)
                </td>
                <td>
                    @Html.DisplayFor(modelItem => item.EnrollmentDate)
                </td>
                <td>
                    <a asp-action="Edit" asp-route-id="@item.ID">Edit</a> |
                    <a asp-action="Details" asp-route-id="@item.ID">Details</a> |
                    <a asp-action="Delete" asp-route-id="@item.ID">Delete</a>
                </td>
            </tr>
        }
    </tbody>
</table>

@{
    var prevDisabled = !Model.HasPreviousPage ? "disabled" : "";
    var nextDisabled = !Model.HasNextPage ? "disabled" : "";
}

<!-- ★★★ページング対応★★★ -->
+<a asp-action="Index"
+   asp-route-sortOrder="@ViewData["CurrentSort"]"
+   asp-route-pageNumber="@(Model.PageIndex - 1)"
+   asp-route-currentFilter="@ViewData["CurrentFilter"]"
+   class="btn btn-default @prevDisabled">
+    Previous
+</a>
+<a asp-action="Index"
+   asp-route-sortOrder="@ViewData["CurrentSort"]"
+   asp-route-pageNumber="@(Model.PageIndex + 1)"
+   asp-route-currentFilter="@ViewData["CurrentFilter"]"
+   class="btn btn-default @nextDisabled">
+    Next
+</a>
コントローラークラスControllers\StudentsController.csで、ソート、フィルター、ページングできるように、Index()メソッドを下記に置き換えます。
// GET: Students
public async Task<IActionResult> Index(
    string sortOrder,
    string currentFilter,
    string searchString,
    int? pageNumber)
{
    ViewData["CurrentSort"] = sortOrder;
    ViewData["NameSortParm"] = String.IsNullOrEmpty(sortOrder) ? "name_desc" : "";
    ViewData["DateSortParm"] = sortOrder == "Date" ? "date_desc" : "Date";

    if (searchString != null)
    {
        pageNumber = 1;
    }
    else
    {
        searchString = currentFilter;
    }
    ViewData["CurrentFilter"] = searchString;

    var students = from s in _context.Students
                   select s;
    if (!String.IsNullOrEmpty(searchString))
    {
        students = students.Where(s => s.LastName.Contains(searchString)
                               || s.FirstMidName.Contains(searchString));
    }
    switch (sortOrder)
    {
        case "name_desc":
            students = students.OrderByDescending(s => s.LastName);
            break;
        case "Date":
            students = students.OrderBy(s => s.EnrollmentDate);
            break;
        case "date_desc":
            students = students.OrderByDescending(s => s.EnrollmentDate);
            break;
        default:
            students = students.OrderBy(s => s.LastName);
            break;
    }
    int pageSize = 3;
    return View(await PaginatedList<Student>.CreateAsync(students.AsNoTracking(), pageNumber ?? 1, pageSize));
}
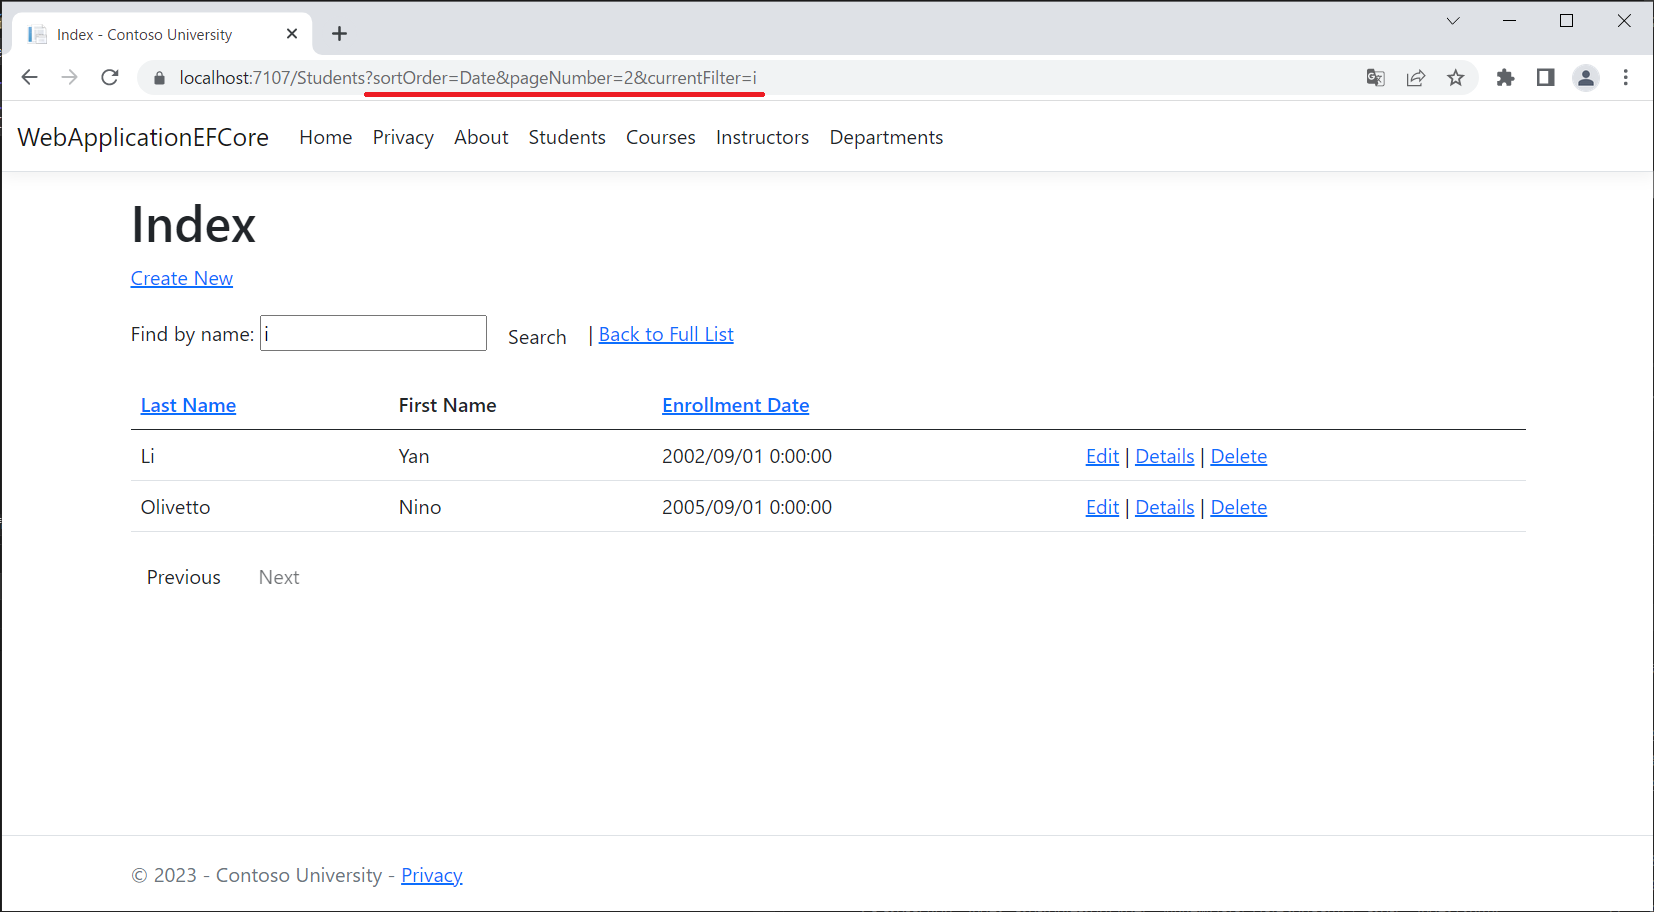
Visual StudioでデバッグF5実行すると、ソート、フィルター、ページングができるようになってます。
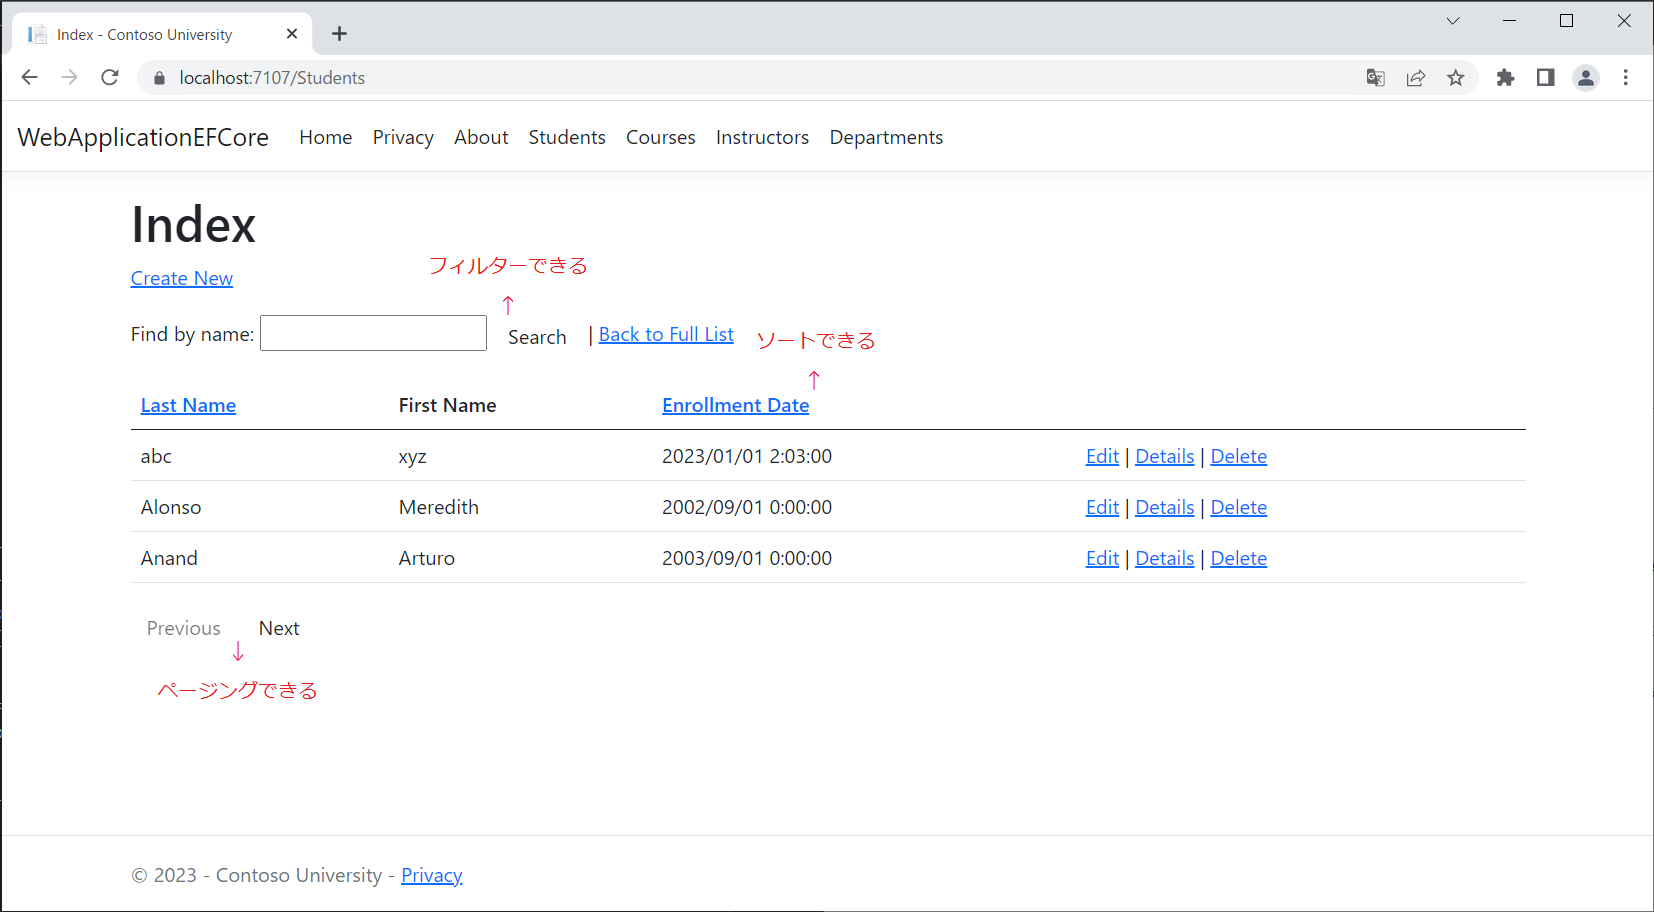
「Enrollment Date」でソートし、「i」でフィルターし、2ページ目を表示した例です。
さいごに
EF Coreを使うと、生SQLクエリ(DDL、DML)を書かなくてもDBの操作ができ、Code-Firstは便利に感じました。ただ、EF CoreのバックグラウンドでSQLクエリを実行するので、何のSQLクエリが、いつ実行されているのかは、把握していたほうがデバッグやパフォーマンスのチューニング等に役に立つと思いました。 今回は簡単なデータ構成でしたが、もっと複雑になった場合、EF Coreの使い勝手はどうなるのか、色々なパターンで検討したいと思います。